Comparing Google Maps and Google Earth
Document: 21st Century Cartography: Using Google Earth and Maps to Empower Student Learning, Maps and Earth Comparison Adobe PDF
| Attribute |
Google Earth |
Google Maps |
| Available at: |
http://earth.google.com |
http://maps.google.com |
| Installation |
Local installation required |
No installation-available online |
| Login Required/File Creation |
No login required to create files |
Login required |
| Media embed code capable? |
Yes, multiple formats: YouTube, Slideshare, Evoca, Ustream, Voicethread,and others |
Yes, YouTube only |
| Text, Image, Hyperlinks available? |
Yes |
Yes |
| Requires knowledge of HTML |
Yes, required to insert imagery and hyperlinks |
No, onboard Rich Text editor provides these capabilities |
| Specialized Applications available in tool |
Yes: Google Sky |
Yes, Streetview, Mapplets, and Personal Profile Page |
| KML and KMZ file creation? |
Yes, both are available |
Only KML file creation is available |
| Export to the other? |
Yes | Yes |
| Community Support |
Yes | Yes |
| Educational Lesson files available online |
Yes | Yes |
The students you target for the course you are developing may be limited by what the computers they are using are capable of running. Such considerations are important as you develop a Google Earth or Google Maps learning object.
Activity:
Post a reflection on the content course you are developing in today's Discussion Forum. The students that take your course may have difficulties accessing either of the Google applications you are including as a learning object. Identify these difficulties and provide possible solutions to the challenges that may arise. Which Google application will you use (Google Earth or Google Maps), or will you be using both?
Optional Reading :
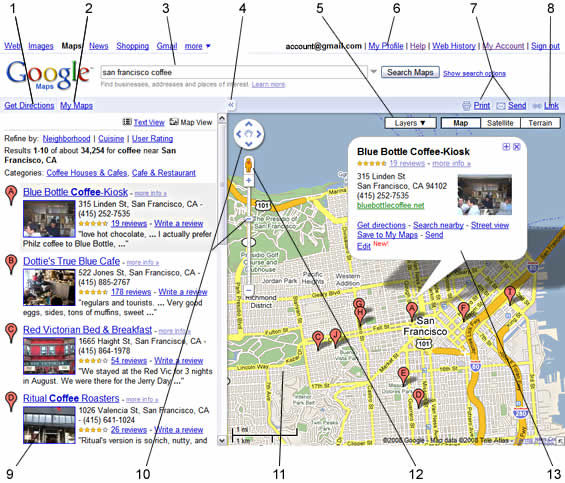
Navigating Google Maps

- My Maps - Use this to view and create custom maps.
- Search - Use this to search for places and businesses.
- Find businesses - Click this for local business search.
- Get directions - Click this to get directions.
- My Profile - Click this to create and edit a profile that is visible to other Google Maps users
- Views - Click these to display different views, including aerial images and street level imagery.
- Saved locations - Click this view or edit your saved locations.
- Print/Send - Click these to print or send maps .
- Link to this page - Click this to create a map web address (URL) in your browser that you can share with others. Learn more.
- Search results - This panel shows search results. Click any result to view more information.
- Navigation controls - Use this to navigate.
- Map - This area displays the map, search results, My Maps and much more.
- Info window - This window displays additional information when you click a marker or search result.
- Overview map - This view shows the location of current map view.
Activity:
Edit your Google Maps to select your default location. The default view that Google Maps displays is determined by your current location. To change this, enter an appropriate address in the search box and click Search Maps. You can also use one of your saved locations. Once your address appears, click Make this my default location in the information window. Thereafter, this address appears as the default location.
Creating a Google My Map
How many different websites/plug-ins did you see being used with My Maps in the video? The potential is out there to provide meaningful projects using this Google application that can astound those that encounter the final product.
Activity:
Create your own My Map using the directions below or via the Google Maps User Guide.To create or edit a map:
- Go to Google Maps.
- Click My Maps > Create new map. If you want to open an existing map, check it in the left panel and click Edit.
- Add a title and description for your map. You can make your map public or unlisted. Learn more.
- Use the icons in the the top right corner of the map. These include:
- Once you are finished, click Done.
Note that these tools do not appear until you create or edit a map (see step 2).
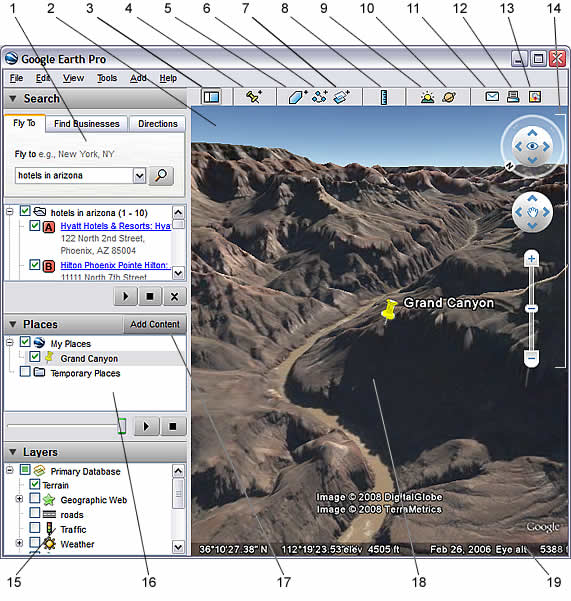
Navigating Google Earth

- Search panel - Use this to find places and directions and manage search results. Google Earth EC may display additional tabs here.
- Overview map - Use this for an additional perspective of the Earth.
- Hide/Show sidebar - Click this to conceal or the display the side bar (Search, Places and Layers panels).
- Placemark - Click this to add a placemark for a location.
- Polygon - Click this to add a polygon.
- Path - Click this to add a path (line or lines).
- Image Overlay - Click this to add an image overlay on the Earth.
- Measure - Click this to measure a distance or area size.
- Sun - Click this to display sunlight across the landscape.
- Sky - Click this to view stars, constellations, galaxies, planets and the Earth's moon.
- Email - Click this to email a view or image.
- Print - Click this to print the current view of the Earth.
- Show in Google Maps - Click this to show the current view in Google Maps in your web browser.
- Navigation controls - Use these to zoom, look and move around (see below).
- Layers panel - Use this to display points of interest.
- Places panel - Use this to locate, save, organize and revisit placemarks.
- Add Content - Click this to import exciting content from the KML Gallery
- 3D Viewer - View the globe and its terrain in this window.
- Status bar - View coordinate, elevation, imagery date and streaming status here.
You can also view the following video to see how to navigate through the program.
You may have noticed the video also shows how to Use the Search panel and Layers panel. These areas will be explored further in our next session.
Activity:
Edit your Google Earth start location. The default start location that Google Earth displays is a view of the Earth from a distance in space. To do this, navigate to the appropriate location and perspective and click View > Make this my start location.
Creating a Google Earth Tour
Once you are familiar with the basics of marking places on the Earth, you can organize them by learning all the features available to you in the Places panel. Most important for your project is to organize your Places in a way similar to how you would organize files and folders on your computer's hard drive.
You can create folders and move other folders, placemarks, or shapes to them.
application that can astound those that encounter the final product.
Activity:
Create your own Places and a folder in the Places panel. You may use the directions below for creating a folder or via the Google Earth User Guide.To create your folder:
- Right-click on a folder in the Places panel.
- Select Add > Folder from the pop-up menu. The folder you right-clicked on is automatically set as the container for the new folder.
Once the New Folder dialog box appears, set the following fields:
- Name
- Description - Enter a description for the folder. For example, you might enter text that gives a general description of all the placemarks in the folder. The first few words of the description appear below the folder in the Places panel. When you double-click the folder, the description appears in a balloon in the 3D viewer. In addition, you can use a number of HTML tags to format your description and include images, including <b></b>, <br>, <img src="...">, and <a href="...">. See Writing Descriptions.
- Style/Color - Once you have other icons within the new folder (or its subfolders) the Style/Color tab is available. You can use this feature to apply label and icon styles universally across all items within the folder. See Editing Places and Folders for more information.
- View - See Setting the View for details. Once you set a view for a folder, double-clicking on the folder repositions the 3D viewer to the position you have chosen. Setting a view for a folder is useful when you want to create a viewing angle to encompass all the items contained by the folder. For example, you might have a collection of placemarks in a specific region of a city, each with an independent viewing angle. You can place them all in a folder and set a viewing angle for the folder in order to display all of the placemarks from a consistent viewing angle, if desired.
Developing a "My Map" or "Google Earth" Project
- Step One: Write a Short Script
- Step Two: Do a Web Search to Locate a Video or Narration Reference (Copy & Paste the URL into the Script)
- Step Three: Locate “A Creative Commons Picture” URL (Copy & Paste the URL into the Script)
Activity:
Begin creating your learning object. Submit a draft of your work in this session's assignment area (even if it contains only one placemark). You can upload the draft by creating a kmz file. Create your own kmz file in either Google Earth or Google Maps by using the File dialog box to save the placemark or folder to your computer. Enter the name for the new file, and click Save in the dialog box. The placemark or the folder is saved to that location with an extension of .kmz. Once you've saved that file, upload it as this session's Assignment.Jump to Assignment now.
