Giving Your Project Some "Bling"!
Importing Text, Images, and Video: Introduction to the Process
Video: Introduction to the Process by David S. Jakes (00:54)
We will explore some of the search tools highlighted in the video during this session. Much of this work will lead toward developing content that will enhance the project you are creating.
Activity:
Read the features of Advanced search at Google Guide's resource titled Google Advanced Search Form (http://www.googleguide.com/sharpening_queries.html). It will help you become familiar with the Google Advanced Search. Use advanced search to find other KMZ files.Editing Text and Hyperlinks to Import in Placemarks
Video: Editing Text and Hyperlinks by David S. Jakes (01:07)
We will explore some of the search tools highlighted in the video during this session. Much of this work will lead toward developing content that will enhance the project you are creating.
Activity:
Read the features of Advanced search at Google Guide's resource titled Google Advanced Search Form (http://www.googleguide.com/sharpening_queries.html). It will help you become familiar with the Google Advanced Search. Use advanced search to find other KMZ files.Adding Images to Your Placemarks
Video: Adding an Image by David S. Jakes (01:11)
We will explore some of the search tools highlighted in the video during this session. Much of this work will lead toward developing content that will enhance the project you are creating.
Activity:
Read the features of Advanced search at Google Guide's resource titled Google Advanced Search Form (http://www.googleguide.com/sharpening_queries.html). It will help you become familiar with the Google Advanced Search. Use advanced search to find other KMZ files.Viewing the HTML Code To Paste into Placemark
Video: Viewing the HMTL Code by David S. Jakes (00:54)
We will explore some of the search tools highlighted in the video during this session. Much of this work will lead toward developing content that will enhance the project you are creating.
Activity:
Read the features of Advanced search at Google Guide's resource titled Google Advanced Search Form (http://www.googleguide.com/sharpening_queries.html). It will help you become familiar with the Google Advanced Search. Use advanced search to find other KMZ files.Importing Video into Your Placemarks
Video: Adding a YouTube Video by David S. Jakes (01:25)
We will explore some of the search tools highlighted in the video during this session. Much of this work will lead toward developing content that will enhance the project you are creating.
Activity:
Read the features of Advanced search at Google Guide's resource titled Google Advanced Search Form (http://www.googleguide.com/sharpening_queries.html). It will help you become familiar with the Google Advanced Search. Use advanced search to find other KMZ files.Creating the Multimedia-Rich Placemarks
Video: Creating the Placemark by David S. Jakes (01:16)
We will explore some of the search tools highlighted in the video during this session. Much of this work will lead toward developing content that will enhance the project you are creating.
Activity:
Read the features of Advanced search at Google Guide's resource titled Google Advanced Search Form (http://www.googleguide.com/sharpening_queries.html). It will help you become familiar with the Google Advanced Search. Use advanced search to find other KMZ files.Upload and Embed Process
Publishing Your Project To Content Shell
Introduction to Google Sky, Mars, and Moon
Explore some of these other tools. Perhaps you may find a way to adapt the content into your course development.
Google Sky can be access in Google Earth 4.3, or use Google Sky straight from your web browser at www.sky.google.com. Be sure to visit the User Guide to get started. Eight special Sky layers highlight special content such as current sky events, historical sky maps, and the Education Center which offers built in content that's ready to be shared with your class.
Many Google Earth files (which use the KML file format) are available to help you with your lesson plans. Here are some examples to spark your imagination:
|
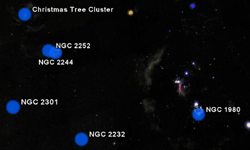
StargazingFind your location in Google Earth and switch to Sky for virtual stargazing. The sky above your location will appear as if students were looking up from their own backyards. Helpful layers for this lesson include Constellations, Backyard Astronomy, and The Planets. |

|
StarsGoogle Earth's Sky is filled with stars waiting to be explored. Use the Life of a Star layer to take your students through a star's lifecycle, from birth to death, complete with beautiful images of real stars at every stage including super nova! Open this KML file to see an animation of a star exploding, or search within Sky for "Eta Carina" to see a nearby star that will explode soon. |
|
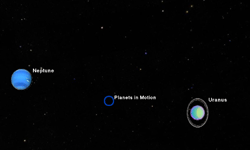
PlanetsUse the Planets layer to examine the trajectories of the planets and demonstrate phenomena like retrograde motion. To explore historical data, use the time slider to find the planets at a given time. Use the Constellations layer to examine the concept of the ecliptic or open this KML file to view elements such as Pluto (not a planet anymore!), asteroids, and planetary moons. |
|
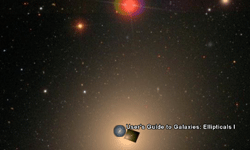
GalaxiesMany of the points of light we see in the sky are not stars, but entire galaxies! Use the User's Guide to Galaxies to learn more about galaxies or turn on the Hubble Showcase layer to see detailed space imagery (zoom in to see individual stars). |
|
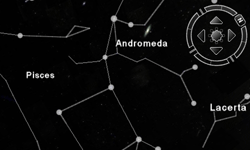
MythologyThe names for many heavenly objects have their roots in human history and mythology. Use the Constellations and Planets layers to show many of these names - a great aid for teaching about the mythical heroes they are named after. For even more mythologically-relevant names, open this KML file to see Pluto, planetary moons, and more. Planet-moon interactions (Example: Jupiter-Io) are often representative of the relationships between characters. |
While your students are exploring the universe, you might want to suggest a visit to Google Moon and Google Mars!
Optional Reading:
Brief Look at Sketchup
Brief Look at Sketchup Students get excited about 3D modeling with SketchUp. Use 3D modeling to explore concepts and ideas!Google SketchUp, whose award-winning toolset was developed for architects to help them design buildings, is modeling software that empowers designers – alone or in teams – to explore complex design ideas in 3D. Now it can do the same for your students. SketchUp is a great tool for easily teaching kids to construct 3D models of buildings, trees, cars, and the like. You can use it as a stand-alone tool, or in conjunction with Google Earth and the 3D Warehouse. There are any number of lessons – from learning about area and volume to studying building and community design – whose concepts are best illustrated in 3D. SketchUp is one of those products that will easily get kids learning – and thinking they're just having fun, as your classes apply SketchUp to geography, social studies, history and industrial technology. Students can use SketchUp to visualize geometry and other mathematical concepts, create models to learn about architecture, and design everything from games and toys to models of spaceships and cars. Theater and film students can use SketchUp to conceptualize their sets. Students can use it to participate in community development projects that involve CAD, GIS, or other design applications. SketchUp can help math students at all levels to better understand geometric concepts. And 3D design can easily be added to any number of classroom projects that aren't directly design-related, from designing a set for a Shakespeare play to creating visualizations of historical settings or getting students excited about history by building a virtual history museum. Explore SketchUp. Perhaps you may find a way to adapt the content into your course development. Activity:
Students get excited about 3D modeling with SketchUp. Use 3D modeling to explore concepts and ideas!
Google SketchUp, whose award-winning toolset was developed for architects to help them design buildings, is modeling software that empowers designers – alone or in teams – to explore complex design ideas in 3D. Now it can do the same for your students. SketchUp is a great tool for easily teaching kids to construct 3D models of buildings, trees, cars, and the like. You can use it as a stand-alone tool, or in conjunction with Google Earth and the 3D Warehouse.
There are any number of lessons – from learning about area and volume to studying building and community design – whose concepts are best illustrated in 3D. SketchUp is one of those products that will easily get kids learning – and thinking they're just having fun, as your classes apply SketchUp to geography, social studies, history and industrial technology. Students can use SketchUp to visualize geometry and other mathematical concepts, create models to learn about architecture, and design everything from games and toys to models of spaceships and cars.
Theater and film students can use SketchUp to conceptualize their sets. Students can use it to participate in community development projects that involve CAD, GIS, or other design applications. SketchUp can help math students at all levels to better understand geometric concepts. And 3D design can easily be added to any number of classroom projects that aren't directly design-related, from designing a set for a Shakespeare play to creating visualizations of historical settings or getting students excited about history by building a virtual history museum.
Video: Google SketchUp: Michelle Kaufman A Case Study (02:46)
(Blocked within LAUSD Network)
Explore SketchUp. Perhaps you may find a way to adapt the content into your course development.
Activity:
1. Download SketchUp. SketchUp users in K12 Education can choose between Google SketchUp (the free version) or SketchUp Pro (which is free for educators and extremely affordable for students and schools). We recommend that most folks in K-12 education try out Google SketchUp (free) – there's no licensing to worry about, and students can download and install it on their computers at home. Learn more about the different versions of SketchUp
No matter which version you choose, you get SketchUp by downloading it from this website. If you download Google SketchUp Pro 6, you'll need a license to keep using it after the free trial period is over; see below for more information on Pro licensing.
Download Google SketchUp (free) | Download Google SketchUp Pro 6 (free trial)
2. Watch the SketchUp video tutorials to familiarize yourself with its features.
3. Review the self-paced SketchUp tutorials, which guide you step by step (using scenes) through concepts of modeling in SketchUp.
4. Check out the SketchUp gallery for ideas on how to use SketchUp in your classroom.
5. Review the SketchUp K-12 Case Studies.
|
